Pin me for later!
Have you been looking to start a blog, but are not quite sure how? If so, you are in the right place!
Starting a blog can be quite overwhelming because there are a million things to do. A lot of which can be confusing and frustrating.
But that’s what this post is here for, teaching you everything you need to know about how to start a successful blog from scratch.
I recommend following the steps in this guide closely, as it will help you build a solid foundation for your blog, which is super important if you want to make money from it.
So grab a notepad, a cup of tea, and let’s get started!
Why should you start a blog?
The first, most important step of starting a blog is knowing why you are starting a blog.
Are you looking to turn your blog into a business that makes money, or would blogging be more of a hobby for you?
The truth is, blogging is not going to make you thousands of dollars overnight, or likely in your first couple of months. Maybe not even in your first year.
But if you work really hard, put in a lot of effort, and give it time, it is very possible to make a substantial amount of money from blogging.
If you are not willing to put in the time and hard work, then maybe you shouldn’t start a blog. But if you are ready to devote your time and energy into your business, then you should definitely start a blog.
Because as time goes on, all of your hard work will pay off!
Why you don’t want to start a free blog:
You may be wondering why you would want to pay for a self-hosted blog when there are a ton of free platforms to choose from. And that is a valid question.
But if you are looking to turn your blog into a profitable business (today or even later on), you need to treat it like a true business, which means investing in it from the beginning.
The truth is, monetizing your blog on a free platform is quite hard, that is, if the platform will even allow you to do so.
Also, when brands visit your website and see that you are blogging on a free platform, it will tell them that you are not serious enough to invest in your business.
But, if you have a self-hosted website, brands are much more likely to want to work with you, because they can see that you are serious about blogging.
Believe me, it is completely worth the $3.95 a month it takes to blog on a self-hosted platform!
Now that you know why investing in a self-hosted blog is so important, it’s time for the next step, setting up your blog. Don’t let this intimidate you, it is much easier than you think!
How To Set Up Your Blog:
1. Choose Your Niche
The first step to setting up any successful blog is choosing your niche.
You may be asking yourself, what is a niche? To answer that question, a niche is a specialized segment of the market for a particular audience/group of people.
A niche is what you will be focusing on when writing your blog posts and creating your brand, instead of writing about every topic for every type of person.
This is a good time to think about and define who your ideal reader is. Your ideal reader is the person who will be reading and interacting with your posts, in other words, the audience you are targeting.
By finding out what your ideal readers’ interests, biggest problems, and struggles are, creating quality content to help them solve these issues will be much easier.
2. Decide on a Blog Name
After choosing your niche, the next steps are all about setting up your blog.
In this step, it is time to pick a name for your blog.
You can technically move forward and complete this step later, but I highly suggest taking the time to do it now, as it will help you build your brand.
Now, when picking a blog name there are a couple of things to keep in mind, such as the length and catchiness.
You want your blog name to (ideally) be short and sweet. Having a short and catchy blog name will make it more memorable for your readers. Which will make them more likely to come back to your blog.
If you are having trouble coming up with a blog name, that’s totally okay. I will help you!
Take out a piece of paper and start writing down keywords that are related to your niche, and some character traits that describe who you are as a person.
After writing down your list of words, put a couple together, and play around with it until you are happy with what you come up with.
Before we move onto the next step, it is important to enter the name you come up with into this website to make sure nobody has taken it
3. Pick Your Website Host
A website host provider is a service that stores all of your website’s information, files, and data on the internet. This is what allows you to have a live website on the internet.
There are so many options when it comes to website host providers, which can make the process of choosing one a little overwhelming.
Which is why I wanted to share with you the website host provider I use for my blog and give you more information about them.
The website host I use for my blog is Bluehost. One of the best parts about Bluehost is that they offer website hosting starting from only $3.95 a month (super affordable).
Another great thing about Bluehost is that with your purchase, you will also receive a free domain name, along with a lot of other benefits. Click here for more information about their pricing and other services.
Why Should You Choose Bluehost?
- WordPress recommends them as an amazing website host
- You will get a free domain name
- You will get a free email
- The installation process is fast, easy, and straightforward
- Their customer service team responds fast with multiple ways to help you
- They are reliable
How To Set Up With Bluehost
Setting up with Bluehost is pretty quick and straightforward, so the process won’t take long at all.
Go to the Bluehost homepage and click “Get Started”.
Then you can pick the plan the best suits your blog’s needs. Once you have decided your plan, click “Select”.
I chose the Basic plan which is perfect for bloggers and has everything you need.
Next, it is time to set up your domain name, which you have already come up with. You get a FREE domain name with Bluehost, but if you have already bought one that you want to use, you can enter that one instead.
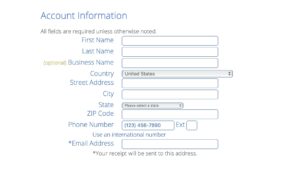
Click “Next” once you have entered your domain name and you will be taken to a page where you need to enter all of your account and payment information to purchase your plan.
After you have filled out all of your account information, click “Submit”. You will then be taken to a page where you will create a password for your account to keep it secure.
Make sure to write down your password somewhere safe, so you don’t forget it.
4. Set Up WordPress
WordPress is extremely easy to set up with Bluehost.
After creating your Bluehost account, click “Go to login” to start setting up your WordPress Website.
You will then see a page that says “Let’s create a website”.
This is where you will enter your blog’s name and information pertaining to what your website is about.
Once you have finished filling in this information click “Continue”.
5. Choose Your Website Theme
The next step is to pick out a theme for your blog.
You will get a list of themes that are recommended for your blog based on the information you entered on the previous page.
You can certainly choose a theme from the list of ones recommended to you, or you can purchase a theme elsewhere.
I personally chose the Charlotte theme from 17th Avenue Designs.
17th Avenue Designs has a bunch of beautifully designed feminine WordPress themes to choose from. These themes will help your blog look professional right from the start.
Also, these themes come with detailed instructions on how to set up the theme you chose with your blog. And if you still have questions after reading the instructions, you can always contact their support team.
Now that you have chosen your theme, you have officially installed WordPress!
Click the “Start Building” button and then “Login to WordPress”. This will take you to your WordPress dashboard.
After all of that setting up, it’s time to play around with your website and customize it.
6. Set Up Important Pages
Once you have set up your blog, it is time to add all of the “necessary” pages to your blog. I put necessary in quotes because you technically don’t need to set up these pages.
That being said if you want to set up a successful money-making blog, then these pages are crucial.
They are:
- about page
- contact page
- legal pages
For your about page, write a few paragraphs about who you are and what your blog is about.
While you want your about page to inform people of the content you will be providing, you also want to be relatable. So, add a couple of pieces of information to help your readers get to know you better.
Your contact page should have your email address where people can contact you. You can also use a WordPress plugin to add a contact form.
The contact page on your blog is not only important for your readers to contact you, but brands as well.
Now, having legal pages on your blog is a must. In fact, it is required by law.
There are three main legal pages that every blog should have. You cannot blog legally without these pages.
The first legal page you need to have is a privacy policy. This is a statement that tells your readers about all of the personal data you collect from them.
And even if you are not aware of it, you are collecting personal data from the people on your site.
For example, when you use Google Analytics or someone posts a comment on your blog with their email address, you are collecting data from them.
The next legal page you need is a disclaimer.
Your disclaimer allows you to legally work with brands and limits your legal liability for the content you post on your blog.
Then there is the Terms and Conditions page (also known as Terms of Use or Terms of Service).
The Terms and Conditions policy is what prevents copyright infringement. Simply put, it is an agreement with the people on your website which states that they are not allowed to copy the content you post.
Now I know that was a lot of information. But I cannot stress enough how important legal pages are. They are what will protect you and your business from lawsuits and other legal matters.
To get all of the legal pages I needed for my blog, I purchased this Starter Legal Bundle. It has all three of the legal templates you need to blog legally, plus 9 bonus templates.
After days of research, I decided to purchase this Starter Legal Bundle because it is what thousands of bloggers and website owners recommend.
It is also super affordable compared to other legal templates and bundles out there.
After purchasing this Legal Bundle, I was able to set up and post all of the legal pages I needed for my blog onto my website within thirty minutes.
It can be that easy!
7. Write Content for Your Blog
Now that your blog is all set up and has all of its legal pages, it is time to write some posts.
I recommend planning out and writing at least 5 different posts that will be on your website when you launch it.
These 5 posts should represent you and your blog. These posts will show readers what they can expect from you.
Take your time writing these posts and make them the best quality they can be. After all, you want to leave a good first impression on your readers to make them want to come back to your blog and read more.
Good quality content is what will make you a successful blogger!
8. Launch Your Site
You have made it to the last step of starting a successful money-making blog!
It is now time to launch your site.
To make your blog go public, go to your Bluehost dashboard in WordPress, and click on the “Launch your site” button.
Final Thoughts
Congratulations, you have created your very own blog that is ready to be discovered. The biggest tip I can give you is to stay consistent. Consistency is key!
Make a posting schedule for yourself, one that is reasonable and maintainable. Readers want to be able to count on you for quality content each week. That is what will make people come back to your blog time and time again.
I hope you found this post helpful and easy to follow. If you have any questions or need additional help, please comment down below.
I understand that starting a blog can be a challenge, so I’m here for you!
Here are some related reads I think you might like:


After reading this post, I purchased the legal bundle you said you used, and I am super happy with it. Thank you for the amazing suggestion!