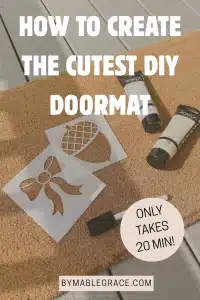
How to Easily Create the Cutest DIY Doormat – And it Only Takes 20 Minutes
Want to learn how to create the cutest DIY doormat? This easy DIY doormat idea will instantly upgrade your front porch — and it’s done in 20 minutes.
One of the realizations I’ve had as an adult is: doormats are SO expensive! Why are they so expensive? To be honest, I’m not sure.
But the point is, it’s actually a lot easier than you would think to re-create a cute doormat. Which is what this post is all about!
Today, we’re breaking out our DIY skills to create an adorable doormat in under 20 minutes!
And if you’re thinking to yourself “Umm… I’m not very skilled in the arts and crafts department,” don’t worry, this DIY is super simple and easy to follow. Trust me, if I can do it, you can too!
You’re going to learn how to create the best DIY doormat from DIY doormat ideas, DIY doormat paint ideas, DIY doormat fall, and more.
I’m going to walk you through this DIY step by step, so by the time we’re done, you will also have a super cute doormat that didn’t break budget!
This post is all about how to make a DIY doormat in just 20 minutes with no craft skills required.
The Inspiration:
I always find DIY’s and any other arts and crafts are easier if you have some inspiration to go off of (at least if you’re not the most artistically skilled, like me haha). That way you know what you want the finished product to look like. It’s nice to have a visual to work with.
This is the doormat I took inspo from:

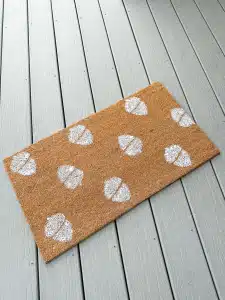
As you can see I didn’t exactly copy this doormat, but I liked the alternating upside down and right side up pattern, so I went with that and made it my own.
Supplies You’ll Need:
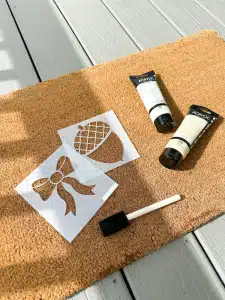
Blank doormats – I bought this set of two from Amazon (pleasantly surprised at the quality) just in case I messed up or wanted to do a second. But if you just want one, Target has this blank doormat for only $7!
Acrylic paint – Honestly the only thing I would change about the way I did mine would be the paint I used.
I used these acrylic paints from Amazon, and while they were good quality, I feel like a runnier paint would have been easier to work with.
I’ve used this acrylic paint before for other projects and I feel like it would have worked better with this DIY too.
Pro tip: White and black paint tend to show up the best on doormats. I did this DIY before with a cream color and it didn’t show up as well as I would have liked (lesson learned :)).
Foam sponges – I would highly recommend you use foam sponges (impossible not to find in a big pack, but they’re pretty darn cheap) instead of regular paint brushes. You’re not necessarily painting on the mat so much as you’re blotting.
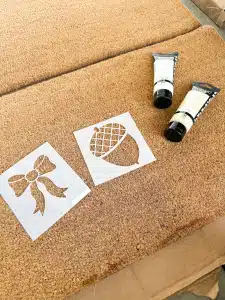
Cute stencils – I got both my acorn stencil and bow stencil from Etsy (they have so many cute options). You can also choose the sizes of these stencils which I liked.
But I bet you can also find some cute stencils at Hobby Lobby or Michael’s. You just might not have as big of a selection.
Painter’s tape – makes holding your stencils in place a lot easier!
Flexseel – I’ve heard this is good for making sure your doormat is weather-proof and doesn’t fade quickly. Fingers crossed that it works – I figured it couldn’t hurt.
How to:
Step 1: Lay out all of your supplies. I did this DIY doormat on my porch, so I laid down some broken down cardboard boxes just in case any paint spilled.
You’ll also want a place to pour out some of your paint. A paper plate should work just fine!
Step 2: Plan out your doormat. I measured out how far apart I wanted my acorns so I knew it would turn out nice and even .
I just did this by marking the mat with painters tape where I wanted each stencil to start and end.
Step 3: Lay out your stencil and when you have it exactly where you want it, tape it down on at least two sides to make sure it doesn’t move around.
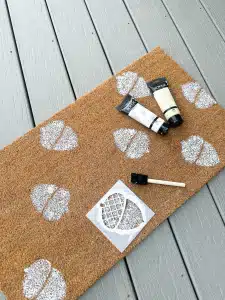
Step 4: Next is the fun part! Dip your foam sponge in some paint (not too much, you don’t want it to be too thick of a layer) and start blotting. Remember, you can always go in with a second coat.
Step 5: If you’re making a doormat with a pattern, like I did, repeat steps 3 and 4 until your doormat is covered!
Step 6: Let the paint dry. This shouldn’t take too long – mine completely dried in 30 minutes.
Step 7: Spray your finished mat with Flexspray. This is an optional step but I highly recommend if you don’t want your paint to fade.
And that’s it! You just made your very own doormat DIY doormat.
This is a super easy and fun DIY to do with friends and families, especially during the holidays. It doesn’t take a ton of prep or work, and you walk away with an adorable finished product.
I hope you had just as much fun as I did doing this DIY! I don’t know about you, but I’m already thinking of recreating this DIY and doing a Christmas doormat. 🤭
This post was all about how to make a DIY doormat in just 20 minutes with no craft skills required.
Other Posts You May Like:

19 Wildly Underrated DIY Halloween Decor Ideas So Good It’s Scary

26 Stunning Fall Table Decor Ideas So Gorgeous You’ll Forget About the Food

I¦ve read some good stuff here. Certainly worth bookmarking for revisiting. I wonder how a lot attempt you place to make this sort of excellent informative web site.